Showing posts with label Slide to the Side. Show all posts

World’s Best Honey Cornbread Recipe
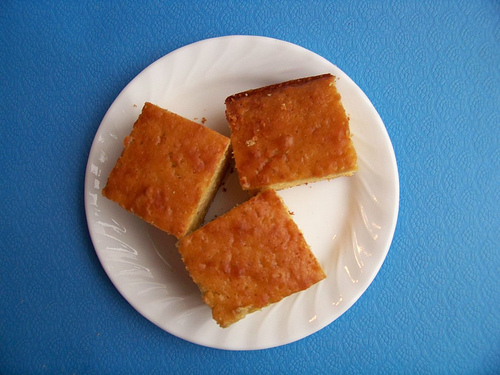
World’s Best Honey Cornbread Recipe

by Crystal on January 20, 2011

moneysavingmom.com


World’s Best Honey Cornbread

  • 2/3 cup sugar (I used turbinado.)
  • 1/4 cup butter, softened
  • 4 eggs
  • 1/2 cup honey
  • 1 1/3 cups milk
  • 2 1/3 cups flour
  • 1 1/2 Tablespoon baking powder
  • 1/2 cup corn meal
  • 1 teaspoon salt

Preheat oven to 400 degrees. Cream sugar and butter. Add in eggs, honey and milk and mix well.

Mix together flour, baking powder, corn meal and salt. Mix dry ingredients with wet ingredients carefully. Do not overmix. Batter will be lumpy.

Pour batter in greased 11×14-inch baking pan. Bake for 35 minutes or until golden brown.

Cheesy Potatoes


Simple ingredients, yummy outcome... every time!

Seriously, shredded potatoes, chips, cream of chicken soup, sour cream and cheese- what's NOT to love?

Yes, I could have shredded my own potatoes, but this is an EASY recipe, so I began with a nice bag of Ore Ida's!

Kelly told me that it is better to have the potato shreds loose and not a big potatoey ice cube- so she will allow the bag to sit on her counter for about an hour before she begins making the dish. I however, chose to remove my shreds from the freezer the night before, and had them to defrost in the refrigerator over night.
Place your shredded potatoes in a large bowl, and add the tub of sour cream and the can of cream of chicken soup. Mix thoroughly!

Mix in the shredded cheese a little bit at a time, until the ingredients are thoroughly combined!

Note: I shredded cheese from a block. I have found that shredding my own cheese really does taste MUCH better than purchasing pre-shreds, plus... I am always able to shred 3-4 cups worth of cheese from a single 8oz block... an 8oz bag of pre-shredded cheese is only 2 cups!

Lightly spray the inside of a 9 x 13 pan, and evenly spread the mixture inside.

Next, take a couple of handfuls of chips, and crush them to smithereens!

Note: Can you tell that I used the Ore Ida bag to crush my chips in? Ziploc's often tear open when crushing items that will have sharp-ish edges. Some "Green" people will even save the thick plastic bags that cereal is kept in inside the boxes to use for future crushing!

Apply a thin layer of chip crumbs over the entire top to the mixture.

Bake at 350* for an hour, and enjoy!

What I love about this dish is that you bake it at home, and you can easily travel without fear of spilling the contents! Cheesy Potatoes are yummy hot and even once they have cooled to room temperature too! Maybe this dish could be passed at one of your next holiday gatherings!

Recipe Recap:
1 large bag of frozen shredded potatoes
2 cups of shredded cheese
1 can of cream of chicken soup
1 tub (16 oz.) of sour cream
Potato chip crumbs (at least 1 cup)

Cranberry Relish


This easy and delicious recipe takes about 10 minutes start to finish, but the best results (tastily speaking) are when these ingredients have been combined at least 12 hours before serving!

Ingredients: fresh cranberries, orangy- citrus fruit and sugar.

Begin by rinsing your berries.

While you are rinsing your berries, look for odd-ball squishable (past their prime) cranberries and toss them aside. Berries that are wrinkly, yet firm are still good to use, but the smushy ones need to go!

Fill your food chopper with berries.
NOTE: Do not fill to capacity, the berries need room to move around to get thoroughly chopped.

Just for the record... I LOVE the smell of cranberries! This step is heavily scented!

The two bags that I had purchased yielded about 8 cups of chopped cranberries.

One cup of sugar needs to be added to each bag of chopped berries.Here are my two cups!
NOTE: This is a once a year side dish... live it up and ENJOY the sugary goodness!
Next it is time to prepare the citrus fruit. This year I am using twoclementines (we're totally addicted!) instead of the typical single orange. You may choose your own preference!

I warmed my clementines in the microwave (20 seconds) to provoke their juiciness!

Then, while the fruit is still warm, roll it between the palm of your hand and the counter to really get the juices flowing!

The original recipe calls for zesting of the citrus peel. I have zested and lacked in zest over the years- and have found that this step isn't essential.
Clementines, in fact, cannot be zested... FYI!
NOTE: I have even substituted straight up orange juice when I have forgotten to bring an orange home from the grocery store... don't worry, this recipe is very forgiving!!!
Slice your fruit in half...

And squeeze all of the juiciness out!

Its OK if a few plump pieces of pulp fall into your dish... they'll be yummy!

Next add your sugar and mix thoroughly! (It *could* be tempting to lick the spoon post stirring, but I wouldn't advise it! Allow your ingredients to meld for a while before sampling to allow the bitter berries to absorb the sweetness!)

Keep in mind that your recipe will shrink due to the sugar added. Just after mixing, my 8 cups of cranberries + 2 cups of sugar are equalling about 6 cups of relish. When the relish is done combining, I will most likely have between 3 & 4 cups of cranberry relish!

Recipe Recap:
2 bags of fresh cranberries
2 cups of sugar
1 large or 2 small citrus-y fruits

Personal NOTE: I don't care for gravy so I have always slathered my turkey with this cranberry relish- try a bite in my honor... you'll thank me!!!

Dinner Rolls


I recently found this recipe and couldn't wait to try it out! I have really been enjoying making yummy foods from scratch! The taste of a little bit of time mixed with effort has been delicious!

To begin making the dinner rolls, first add 1/2 C. milk to 1/4 C. of water, and add 2T. of butter. Warm these ingredients on the stove top (Do not boil! I just watched the butter chunks melt to know when the liquids were warm enough!)

While the milk, butter and water are warming, mix 3/4 C. flour, 1/2t. salt, 2T. sugar and an envelope of rapid rise yeast.
Add wet mix to the flour mix and beat for 2 minutes in your mixer.
Add 1/4 C. flour and beat on high for 2 more minutes.
Slowly, add 1C. of flour... I did this step 1/4 C. at a time!

Next, the dough needs to be kneaded! Generously flour your work surface, and knead for 8-10 minutes. *If you have never kneaded dough before, it is very simple! Smush the dough with the heels of your hands, pressing the dough away from your body. Then spin the dough 45 degrees and knead again!
Knead the dough for about 8-10 minutes.

After kneading, the dough needs to rest for 10 minutes. I made my dough into a ball, and then I laid a damp paper towel over the dough while it rested.
Then I cut the dough into 12 even pieces.

I should have taken more time to shape the dough into balls... next time!
The 12 dinner rolls need to be placed into a well greased round baking pan.
(I placed 9 rolls around the edges and three in the center!)
The dinner rolls now need to rise.
I covered my pan with aluminum foil and set the pan on our stove top with the burner on the lowest setting. The rolls need to rise for 30 minutes.
After the rolls have had half an hour to rise (the warmth from the burner really helps!), brush the tops with a little bit of melted butter and gently sprinkle with salt!

Bake the rolls for 20 minutes at 375*. Mmm, these rolls were delicious- even a little bit sweet!
I think that the next time that I make these rolls, that I will multiply the quantity. I am thinking that I will not allow the dough to rise, I will just roll into balls, after the dough has rested, and then freeze the dough for individual rolls for a later date. I'll keep you posted!

Recipe Recap:
2-2 1/4 C. all purpose flour
1 envelope yeast
2T. sugar
1/2t. salt
1/2 C. milk
1/4 C. water
2T. butter

Applesauce


Often, my local Meijer will have a reduced rate fruit and vegetable cart on display around 10 in the morning. I'm happy to spend 33% of what these items would usually cost in return for consuming them quickly.

In the past I have purchased banana's for making banana bread, lettuce for dinner the same night, and even vegetables like pea pods and broccoli that I turned into a stir fry dinner later that evening. With a little bit of creativity and flexibility meals made with fresh ingredients can become much less expensive.

Yesterday I picked up 6 apples and 4 pears... all bruised and pretty ripe. I'm pretty sure that in the state that I brought them home in- that they would not have been consumed...

But after peeling (which was super easy thanks to the fruit being very ripened)and slicing...

And boiling (for 20-30 minutes) the apples and pears with half a cup of brown sugar and 1 teaspoon of vanilla (my secret ingredient)...

Then, just mash with your potato masher and serve either warm or out of the fridge.
Viola! and Yumm-o if I do say so myself!

The near-dozen apples and pears yielded about 9 cups of apple/pear sauce! If you feel like you can't consume this much sauce (ahem, you have yet to take a bite...) than feel free to freeze some for later! I wish that I could have bottled the aroma from the cooking... it was ridiculously yummy!
***An extra special thank you to my Mother in Law, Pam Webber, for introducing me to this yummy treat!